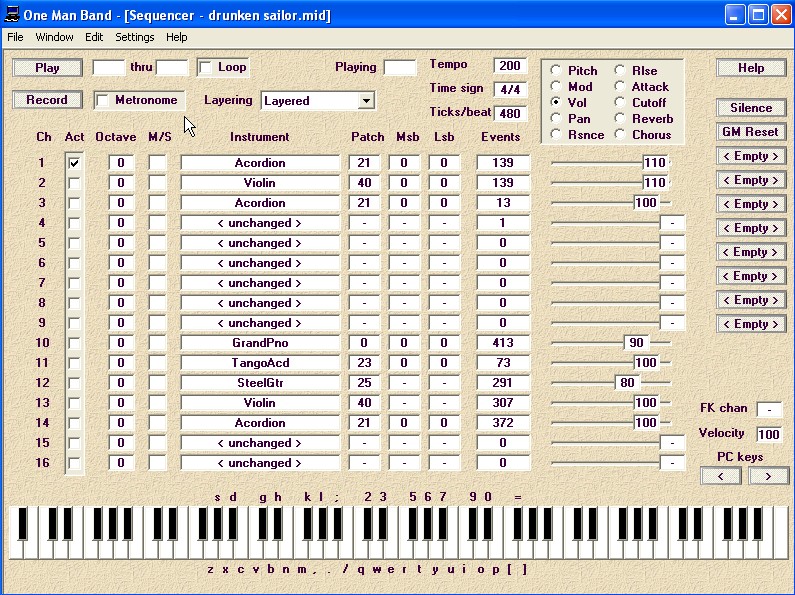
In the sequencer window you can edit MIDI files in detail. The files may be created with One Man Band or other tools. Files read may be type 0 or type 1. Files saved will always be type 1 (each channel in a separate track). The files to be worked on may be files with the extension .mid or .kar. Karaoke files with extension .kar are in fact MIDI files. The only reason that they have the extension .kar instead of .mid is to show that they have lyrics included, but MIDI files can include lyrics as well. The Karaoke window in OMB is a different view on the same loaded MIDI file.
The piano keyboard at the bottom of the screen can be used to play notes with the mouse. Adjust the note-on velocity if necessary. The keys can also be played with the PC keys listed below and above the keys. Change the assignment of the PC keys with the < and > buttons. You can define keycombinations (chords) to the function keys F1 thru F12. To define a function key, keep it pressed and click on the keyboard to indicate which keys should play with this function key. The next time you play the function key all associated keys will play. If you want these function key chords to play on a specific channel then specify this channel in the field labeled "FK chan"
Load a MIDI or karaoke file with menu "Settings/Open MIDI file" and press the Play button. The MIDI file will start playing and the barnumber is listed in the field labeled "playing". To play a certain part of the file: fill the start barnumber and the ending barnumber in the fields after the play button. To repeat this part continuously: check the Loop option.
Press the Record button to start a recording using the on-screen keyboard or a connected MIDI keyboard controller. When you are recording your own performance from a MIDI keyboard controller or from the PC keyboard then this will be recorded on the channels that are checked in the columns with the heading "A" (the active channels). While recording from a sequencer or arranger that is sending on up to 16 channels at once, you should check the Mult option. In that case each received note is recorded in it's original channel unless you change the channel value in the column with the heading "To". The "To" column is only visible when the Multi option is checked, replacing the "A" column. To produce metronome ticks while recording: check the Metronome option.
Change the tempo to make the sequence play faster or slower. You can also change the Time signature and the Ticks/beat but that will have no effect at all at the way the previously recorded sequence is played. It will only effect the way the notes are displayed in the eventslist and pianoroll. Choose a Time signature and a Ticks/beat value before you start recording a sequence. The Ticks/beat value is limited to certain values. You can modify it in a window that pops up when you click on the value.
There are 16 channels available for recording. The column marked "A" (Active) indicates wich channel is played when a key is played on your keyboard. When more then 1 channel is activated then the note wil be played with layered voices, playing each each channel with it's own instrument at the same time. The Active option has no effect on previous recorded notes, use the Mute/Solo (M/S) column for that.
The octave allows you to to increase or decrease the pitch of the notes played on the keyboard. It has no effect on previous recorded notes, use menu edit/transpose to change the pitch of previous recorded notes.
The M/S (Mute/Solo) let's you include or exclude certain channels in the MIDI file. Left click to mute a channel and right click to make it the solo channel (mute all other channels). This has no effect on the notes played thru your keyboard.
Click on the instrument name to select from the instrument banks or fill the patchnumber and the Msb and Lsb number of the bank.
The Evens column lists the number of events (notes, controllers etc.) in this channel. Click on the listed value and a menu will popup with a choice for the eventslist or pianoroll. Use these to tools for detailed editing of the notes and other events in the sequence.
When the sequencer is not playing, you can use the sliders to adjust the main volume. The changed value will replace the value at the start of the sequence. If no value is present yet then one will be inserted. Instead of the volume you can select one of the other controller types and assign it to the slider.
When the sequencer is recording then the values of the moving slider will be inserted in the sequencer at the current position. This way you can record live effects.
The buttons on the right can be used to send system exclusive messages and controllers. Right mouse click to define the MIDI data to be sent.
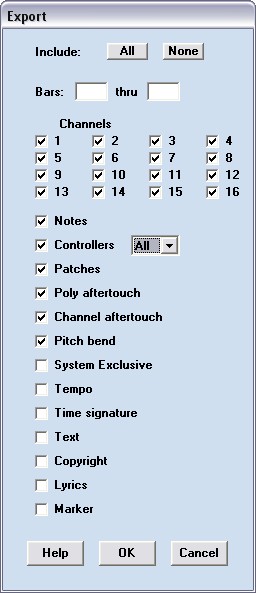
With menu Files/Export you can export part of the sequence to a MIDI file. Specify the first and last bar from the sequence that you want to export. Check the channels and event types that sould be included.
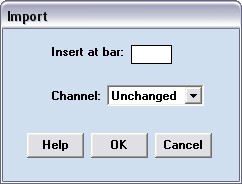
Select menu Files/Import to add the contents of a MIDI file to the currently loaded MIDI. Specify at which bar the import sequence must start. You can specify a channel where all events should be placed.
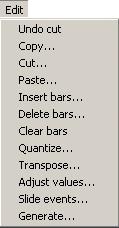
Numerous operations can be performed on the sequence in the Edit menu. The last operation can be undone. The window that pops up when you select Copy or Cut is similar to the window for the Export function. You can specify the first and last bar and the channels and event types to include. The Window for the Paste option is similar to that for the Import function. Specify the bar where the pasted sequence should start and specify a channel if it is different from the copied channel(s).
The Insert bars option will ask for the number of bars to insert and the bar of the starting position. The sequence after the starting point will be moved the specified number of bars. The Delete bars option will ask for the first and the last bar in the sequence. All events in this range will be deleted and the sequence after this range will be moved back to the first bar of the range. The Clear bars will do the same but will not move back the sequence after the deleted events, leaving a gap.
![]()
The Transpose option will show a window where you can specify the first and last bar of the range to transpose. Specify the number of Semi tones that the pitch should change. Check the channels that must be included in the transposition. Do not include channels that play the drums.

The Adjust values option in the Edit menu makes it possible to change the values of controllers and velocity of notes. The old values will be extrapolated to the range specified. Values in MIDI range from 0 thru 127, so specifying a new value range of 0 thru 63 will make all values lower and specifying 63 to 127 will make values higher. Specifying a new value range of 100 thru 100 will make all values equal to 100. Select the events included in this operation by specifying the channels and types in this window.
The Slide events option will move a part of the sequence a specified number of ticks. This may be needed if a sequence is a playing a little before or after the beat.
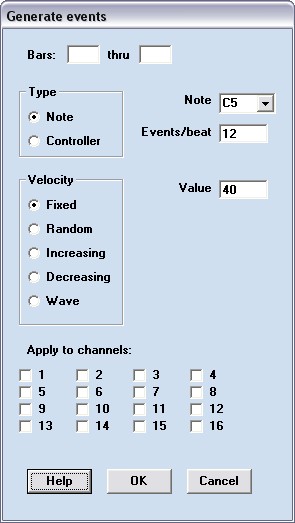
The Generate events option in the Edit menu will add notes or controllers to the sequence. Specify the first and the last bar of the range where the events should be added. Select Notes or Controllers. Specify the Note or Controller type and the number of events per beat that will be added. Select wether the values of the events should be Fixed, Random, Increasing, Decreasing or vary in a Wave. Specify the fixed value or the range of values (random, increasing, decreasing). For waves also specify the wavelenght in beats. Check the channels where the events will be generated.