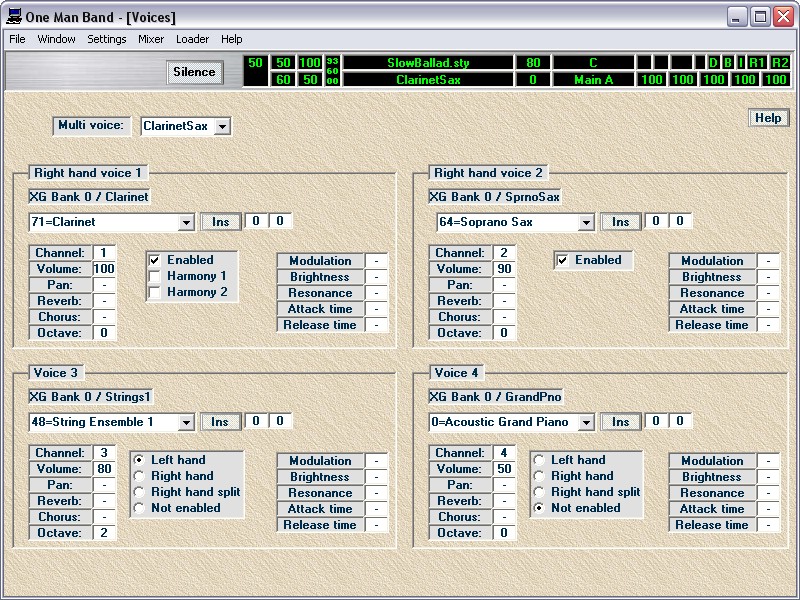
Defining multi-voices.
In this window you can define the voices of the melody played with the right hand and left hand voices.
In the list box at the top you can select from the 60 available multivoices. You can also change the name by typing over it.
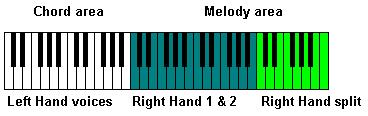
A multivoice consists of 4 voices, each operating on a different channel on the synthesizer. The first 2 voices (right hand voice 1 and right hand voice 2) are always assigned to the melody area shown in dark green above. If both voices are enabled then they will sound layered (mixed) when you play keys in this area. Voice 3 and 4 can be assigned to any of the 3 areas in the keyboard above.
If you assign voice 3 or 4 to the right hand then it will be added to the right hand 1 & 2 layering.
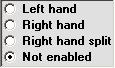
Select left hand and it will sound together with the keys played in the chord area. The left hand voices are by default switched off when the auto-accompaniment is running but you can toggle them on and off with the function key for this. The on/off status of the left hand voices (L) and the right hand voice 1 (R1) and 2 (R2) is visible in the main display.
The right hand split is a separate area on the right of the melody area as defined in the keyboard layout. You can play the keys in this area with a different instrument. If none of the voices is assigned to the right hand split then the right hand 1 and 2 area will be extended in the right hand split area. This is the case with all the predefined multivoices.
In voice 1 you can add harmonies. When you press a key in the melody area then extra notes will be added that fit in the chord that is played in the chord area. Harmony 1 is close-harmony: the added note is a little lower then the melody note. Harmony 2 is wide harmony: the added note is much lower then the melody note.
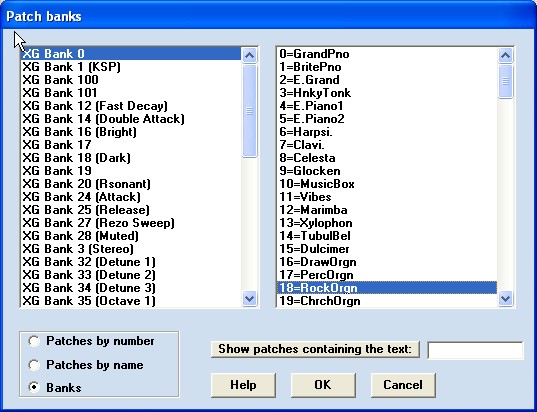
When an instrument is selected in a synthesizer, this is done by sending a patchnumber varying from 0 (piano) thru 127 (gunshot). If a particular instruments bank is needed then the patch is prededed with two controllers specifing the msb (most significant byte) and lsb (least significant byte) of the banknumber. The patch can be selected in the list box and the msb and lsb in the two edit-fields on the right.
If you have a simple GM (General MIDI) synthesizer then you may just need to select from the 128 instruments in the patch list and leave the msb and lsb value zero. If you do need to select instruments from many banks then there is another option to select instruments by name rather than patch/msb/lsb number. The name displayed in grey above the patch name comes from the instrument definitions file. You can select from the instrument names when you click the ins button.
The instrument banks in this file are the XG set of instruments. You can select a bank on the left and an instrument on the right. Or click on the patches option and select form a continuous list of patches. The instrument definitions file is in standard Cakewalk format and can be replaced by a file with the description of your own synth.
Do you have a synthesizer with patches that are numbered from 1 - 128 instead of 0 - 127? No you don't! The patches in your synth are triggered with the values 0 - 127 just like any other synth. If the manual lists them as 1 - 128 then this is just because it is more "people-like" to start numbering with 1. But in the "computer-like" synthesizer the numbering starts with 0.

The channelnumber of each voice would be typically the same as the voicenumber. But you can assign it to another channel if you want. Because you can assign each channel to a different MIDI Output port in menu setting/MIDI-Out, this means that you can assign voices in the same multivoice to different synthesizers. Stay in the range of channel 1 to 8 for the multivoices because the styles typically use channels 9-16.
Not all the effects that can be edited in this window will be recognised by each synth. Check the "MIDI implementation chart" of your synth. Pan means the place the instrument will have in the stereo balance. Reverb specifies the spatial effect or echo. Chorus effect makes it sound like more instruments are playing at the same time.
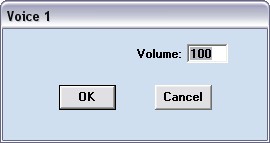
When you click on any of the numeric values in the voices window then an edit window will popup where you can change the value. A value of zero (0) is not the same as an empty value (-). When the value is zero then this effect will be set to zero if the multivoice is selected. But when the value is empty the effect will stay unchanged and have the same value as before the multivoice was selected. To make the value empty: delete all the characters in the edit field or fill a - (minus) character.
Another option to change the values is to drag it with the mouse. Point at the value press the left mouse button and move the mouse forward an backward with the mouse button still pressed. And then there is the mixer window to change the values in both multivoice and style.
The effects listed above are controlled with the controller types 1 and 71-74 on most synths. But synthesizers can have much more effects that are controlled on different ways with all kind of RPN and NRPN controller sequences and with sysex (system exclusive) messages. There is no standard for this. Fortunately you can specify these features in OMB in sysex files. The sysex files can be standard .syx files but in OMB you may also include sequences with controllers and patches in hexadecimal values in between the system exclusive messages. The sysex files can be attached to the sysex menu or can be included in the presets in the presets menu. When 60 multivoices are not enough for you then it would be an option to include complete multivoice definitions in hexadecimal notation in the 3600 presets.
Back to the One Man Band main page.