The
Stylemaker window (2).
To create a style from a
MIDI file, first select menu "File/New style" and
press the OK button in the "New part" button. Then
press the Load button and select a MIDI file. Then press the
Paste button.
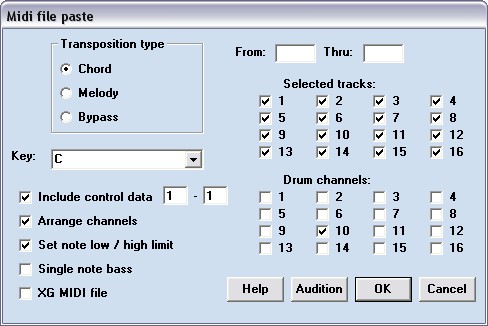
Press "Audition"
to play the midifile. Specify from and true to select a part.
Press OK to paste this part of the midifile into the current
style part.
Tranposition
type chord (for main variations)
will change all the note events to either C, E, G or B to fit
in a CMaj7 chord.
Transposition type
melody (for intros and endings)
will not do this but you have to specify which key the melody
is played in and the notes will be transposed accordingly
without changing the melody. To determine the key: determine
what would be the most likely first note to play after this
part of the midifile, that will be the key.
Include
control data: specify the first an
last bar where the control data (instrument settings for each
track) should be taken from. Or leave this option unchecked
to prevent the control data that is already present in the
style from being overwritten.
Arrange channels: the destiny channels for Yamaha styles are
typically 9 thru 16 with the drums on 9 and 10 and the bass
on 11. Checking this option will take care of this.
Set note low/high
limit: the boundaries will be
determined based on the note events present in the selected
bars. Instruments often just sound good at certain pitches.
Single note bass: If the resulting style part sounds off, then try
to paste it again with this option.
XG midifile: check this option if the midifile contains XG
bank numbers and drum channels other then channel 10.
Selected
tracks: exclude the solo
instruments.
Drum channels: specify which channels contain drum events and
shouldn't be transposed.
Part and track menu
options
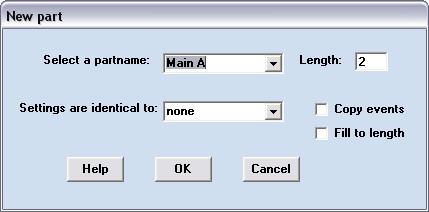
The New part window will
appear when you select the menu option File/New style or Part/New
part. Select a partname. You can
also choose to make the settings of this part identical to a
part that is already present in the style. If you do so then
you can copy the events as well if you check the "Copy
events" option. If you already have a Main A then you
can copy it to Main B and then make some modifications to
Main B. If the specified lenght of the new part is longer
then the original part then check the "Fill to
lenght" option to repeat the contents of the original
part in the new part.
Menu Part/Delete will remove the current part from the style.
Menu Part/Delete
bars will ask for the first and the
last bar to delete from the part. Part/Insert bars will ask for the insert position and the number
of bars to insert in the part, empty bars will be inserted
that need to be filled. Part/length will ask for the new lenght of the bar, if it
is longer then the original length then choose the "Fill
to lenght" option to repeat the events in the bar. All
these three actions will change the length of the part.
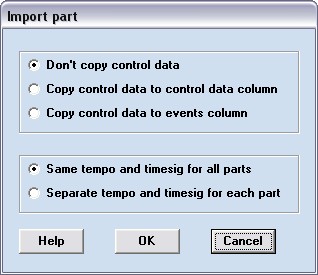
Menu Part/Export can be used to save a Part and
use it later in an other style. Select menu Part/Import and select a previous exported
part from the file selection box. A window will appear with
options how to import this part.
If the
instrument settings should be the same in all parts then
choose the option "Copy control data to control data
column". This means that the control data for the
instrument settings will be used style wide for all the
parts.
Choose
"Copy control data to events column" if you plan to
use different instruments in each part. This will be
necessary if you make a style with parts from differents
styles. If you include the instrument settings at the start
of one part then al the other parts should have instrument
settings as well.
Choose
"Don't copy control data" if you want to use style
wide instrument settings but you don't want the current
control data to be overwritten. You may already have copied
the control data from another part and did some editing on it
in the mean time.
Only
select "separate tempo and timesig for each part"
if you really want to apply different tempos in each part.
Menu Part/Quantise: Select the resolution to which the note
starting times of the notes will be adjusted. With the
"quantize ending times" option also the duration of
the notes will be changed (not recommended).
Menu Part/Transpose: The pitch of the notes can be changed with a
value from -12 to + 12 semitones. Select the tracks that you
want to transpose. Don't transpose the drum tracks.
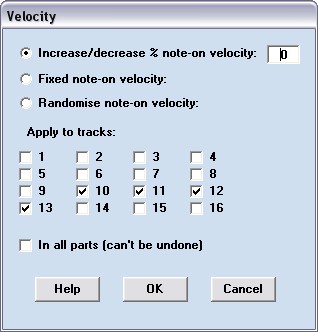
With menu Part/Velocity you can change the velocity (loudness) of the
notes. To increase or decrease the note on velocity: specify
the percentage change between -99 and + 99. Because the
maximum velocity is 127, the velocity increase will not be
the percentage of the original velocity but the percentage of
(127 - original velocity). To give all the notes the same
velocity: specify the fixed value. To give a "live"
effect define a random value between 1 (little variety) and 9
(much variety). With the "In all parts" option this
action will be done in all the parts in the style.

Menu Part/Synchronize is an advanced options to fix parts that play
out of pace. If you record a MIDI file by playing piano in
your own tempo without listning to a metronome or other
accompaniment created by the sequencer, then the recorded
MIDI file will be unsynchronised. The start of the beats and
the bars that are to be heared in the music will not be in
the same time as the sequencer beats and bars. When you try
to make a style from an unsynchronized MIDI file, then the
beats in the result will play out of pace with the beats of
the MIDI clock (visible in the red and green lights on
screen). E.g. if you have 5 bars pasted into a part then the
first beat of each bar may be at 1:02:0365, 2:02:0423,
3:02:0475, 4:03:0066 and 5:03:0107. To correct this you can
specify to fit the sequence from 1:02:0365 thru 5:03:0107
into 4 bars. As a result the first beat of each bar will be
at 1:01:0001, 2:01:0001, 3:01:0001, 4:01:0001. You may have
to quantize too, if you want to get this exact result.
Menu Part/Fade in and Part/Fade
Out will gradually
raise the expression controller value from 1 to 127 or lower
it from 127 to 1.
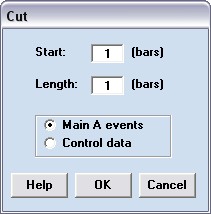
The window
above will appear when you select menu Track/Copy or Track/Cut. Specify the first bar to copy and the number
of bars. If you want to copy the instrument settings in the
Control data instead of the notes in the part track then
select "Control data. After a copy or cut action you can
use the Track/Paste menu option to insert the
contents in another track. Always click on the desired track
first before you select a track menu option.
The Menu
options Track/Quantise, Track/Transpose, Track/Velocity, Track/Fade in and Track/Fade
out are similar to
their counterparts in the Parts menu.
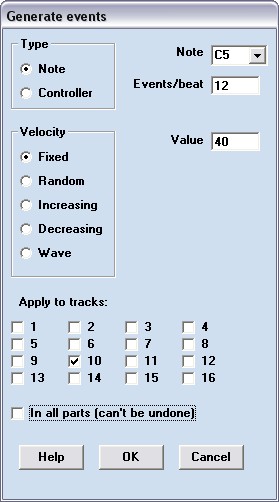
The Track/Generate menu option will add notes or
controllers to the selected track. Select Notes or
Controllers. Specify the Note or Controller type and the
number of events per beat that will be added. Select wether
the values of the events should be Fixed, Random, Increasing,
Decreasing or vary in a Wave. Speciy the fixed value or the
range of values (random, increasing, decreasing). For waves
also specify the wavelenght in beats. Check the channels
where the events will be generated.
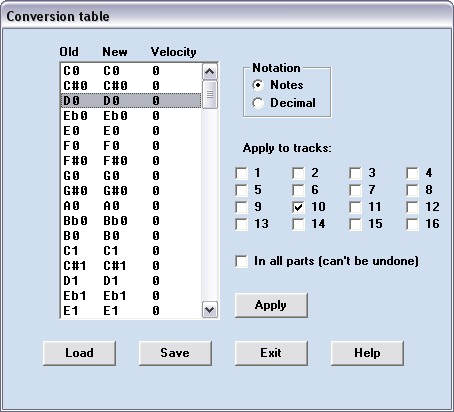
If the
style uses a drumset that is not present on you synthesizer,
then this may lead to very awkward sounds. With the Track/Convert menu option you can convert the
drums notes so that they will give a better matching sound.
The simplest way is to load the "bongos and congas"
conversion table, select the drum track(s) that needs
conversion, check the "in all parts" option (if
you're sure that the situation is the same in all parts) and
press apply. Now it's all finger tapping what is less
annoying then hooting owls and cowbels.
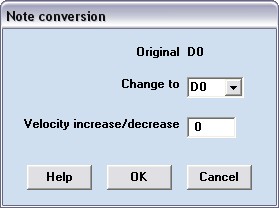
You can
make your own conversion table. Double click on any note in
the conversion table and select a new note and/or change the
velocity. Save the conversion table when you are ready.
The Track/Kill menu option will delete both
the events in the track as the CASM settings, Track/Wipe will just delete the events.
Back to
the One Man Band main page.